We’ll walk you through several tips for using Apple Numbers on Mac. From starting with a template to applying conditional highlighting, open Numbers and follow along!
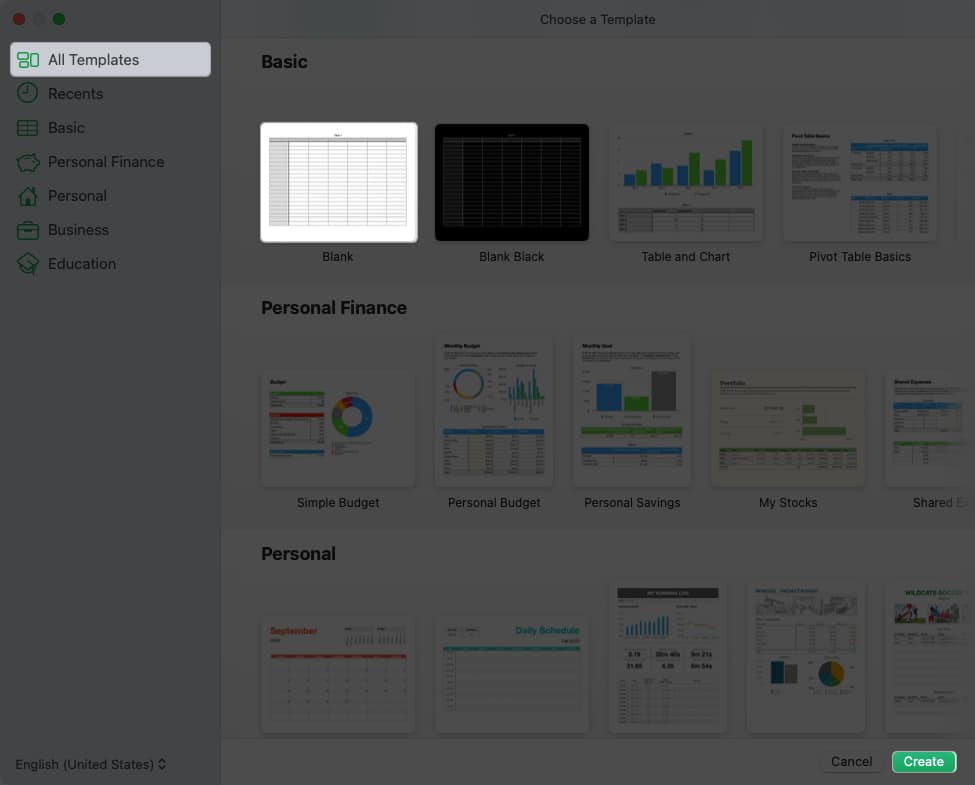
1. How to start with a template in Numbers
If you want a jumpstart on your Numbers spreadsheet, you can start with a template. You’ll find a decent selection of personal, business, and educational templates for common tasks. Once the template opens, simply add your own data. You can also make edits to the template formatting to tailor it to your needs.
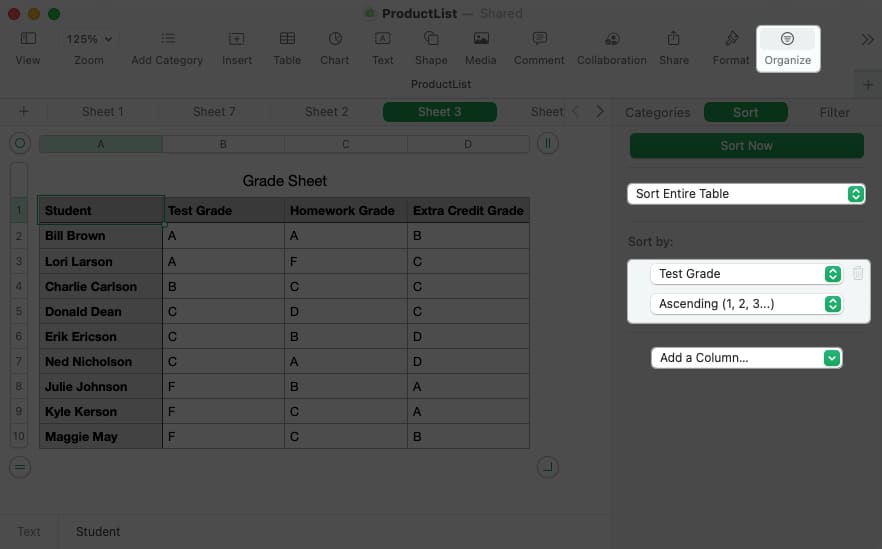
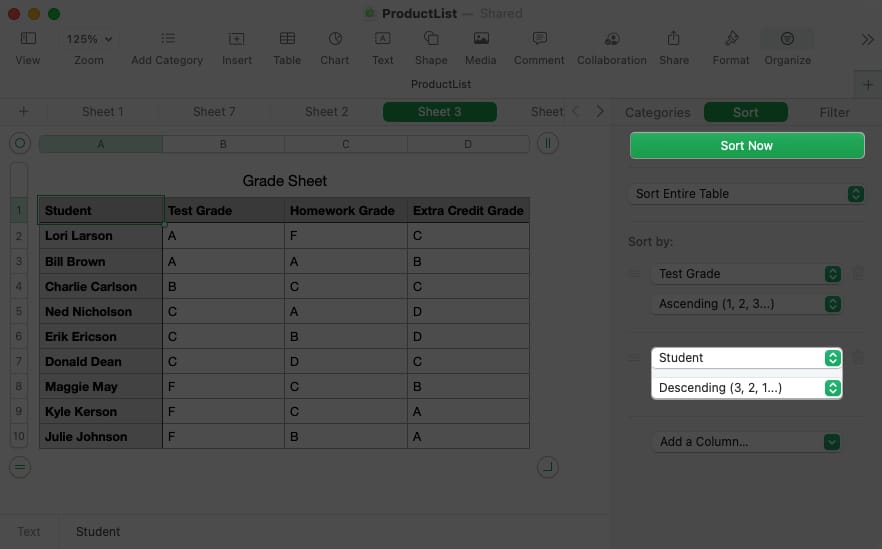
2. How to sort data in Numbers
When you have a spreadsheet that includes a lot of data, manually manipulating it can be time-consuming and you run the risk of errors. Instead, you can use the sort feature for the data in your sheet.
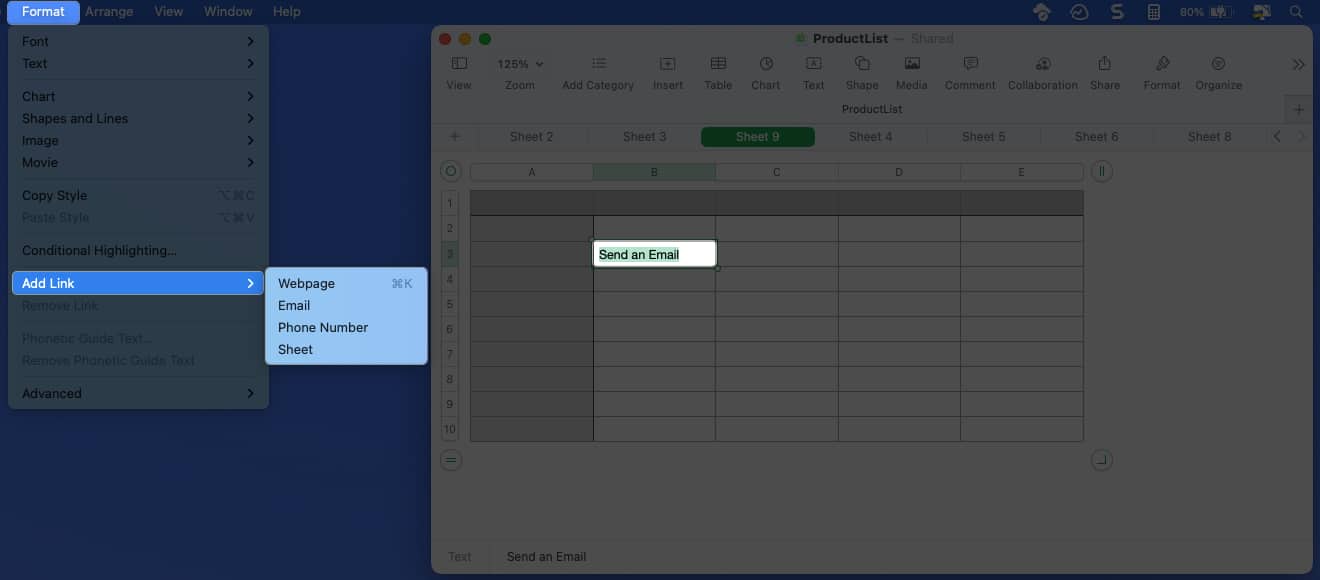
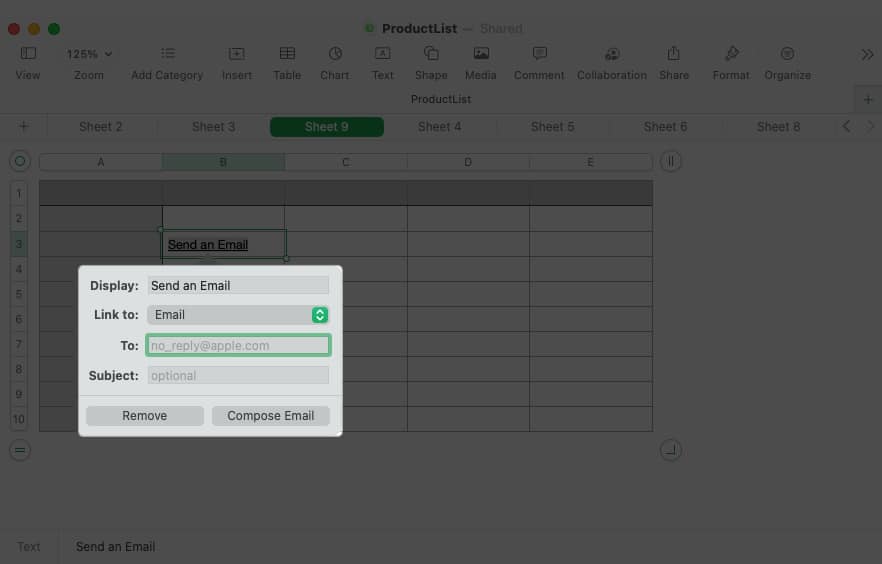
3. How to add a link in Numbers
Maybe you’d like to include a reference to another sheet or a quick way to visit a website. You can add a link in Numbers to a sheet, email address, web page, or phone number. Then, with a simple click of the link, you can open the sheet, compose an email, visit the page, or make a phone call. To make changes to the link or remove it later, select Format in the menu bar and pick Edit Link or Remove Link.
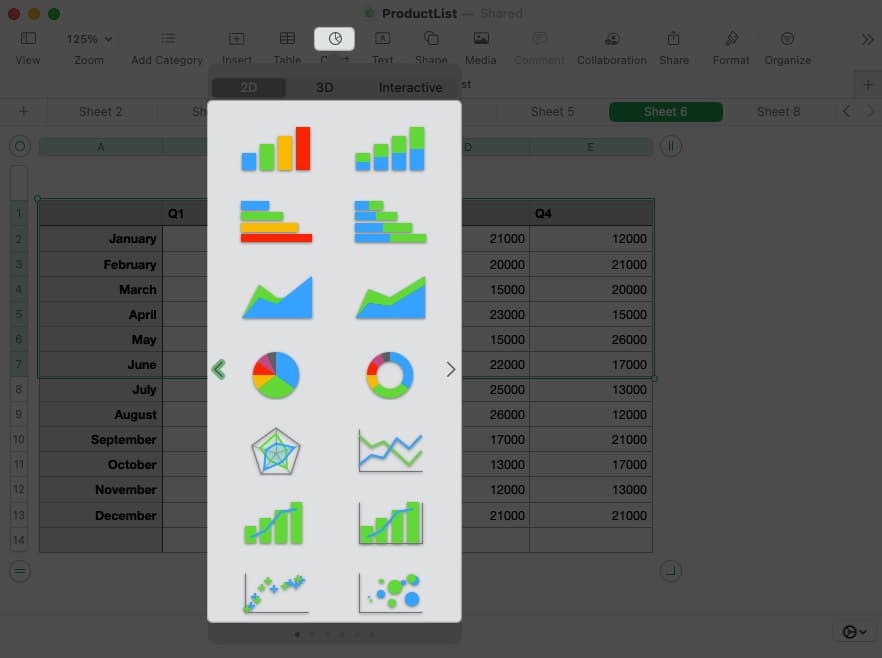
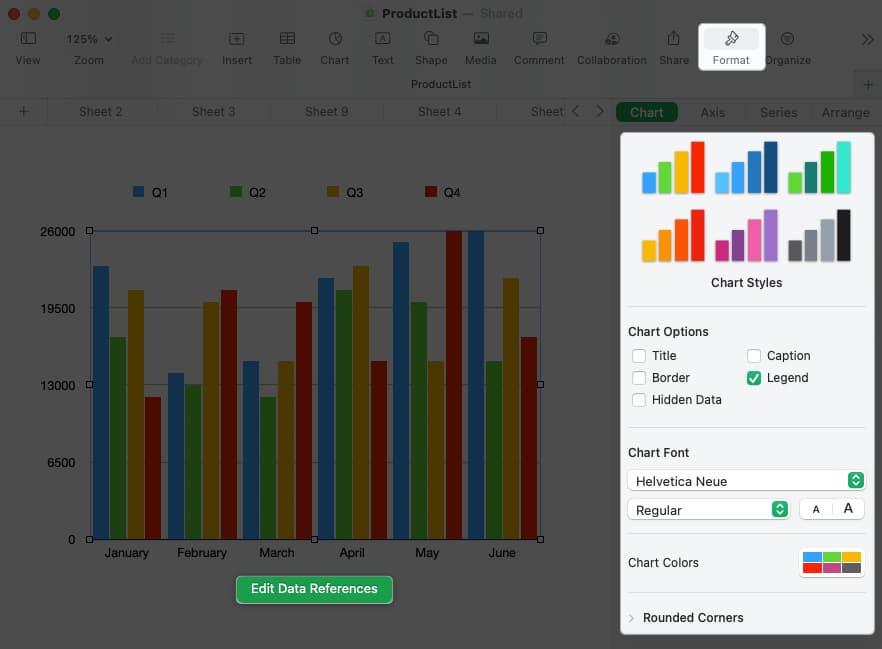
4. How to create a chart in Numbers
Charts and graphs are terrific visuals for displaying data. They allow you to see highs and lows, trends, or patterns at a glance. In Numbers, you can choose from 2D, 3D, and interactive charts.
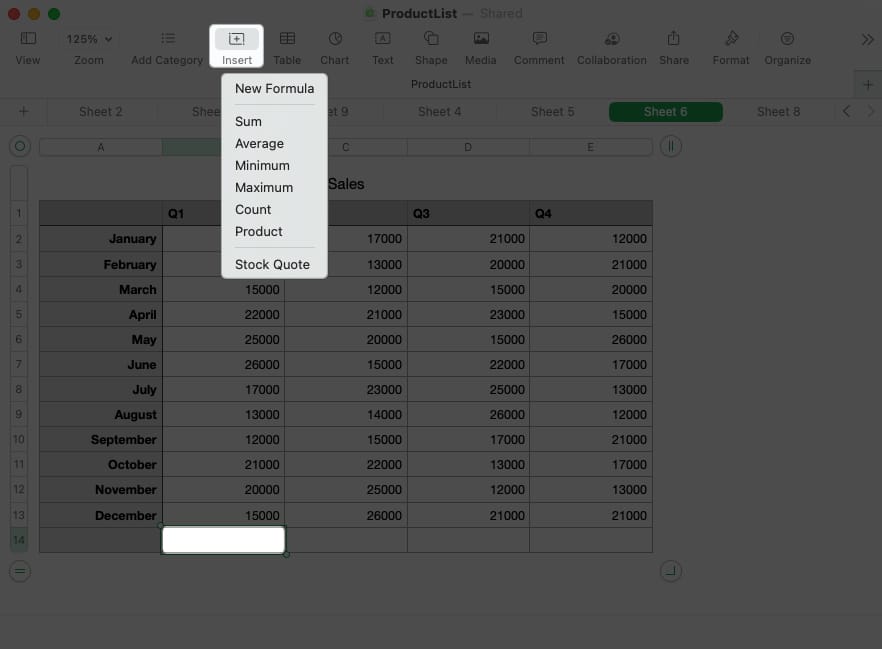
5. How to perform simple calculations in Numbers
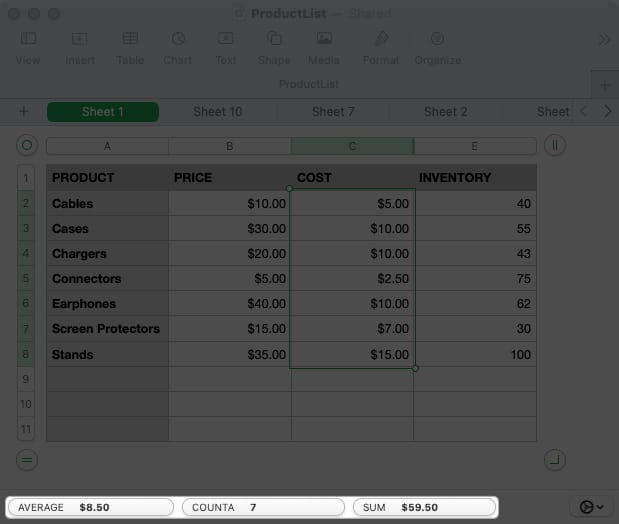
One of the most common things you’ll likely do in your Numbers sheet is to perform calculations. Luckily, you can add, average, or get the maximum amount from a data set in just a couple of clicks. You’ll see Numbers use the values in the column if you use the bottom cell or row if you use the far-right cell to perform the calculation for you. To edit the formula for the calculation, double-click the cell to display the formula bar. Then, make your changes and use the checkmark in green to save it.
View calculations at a glance
Maybe you want to use one of these calculations, but not necessarily add it to your sheet. Instead, you can display one or all of them at the bottom of the window.
6. How to insert formulas in Numbers
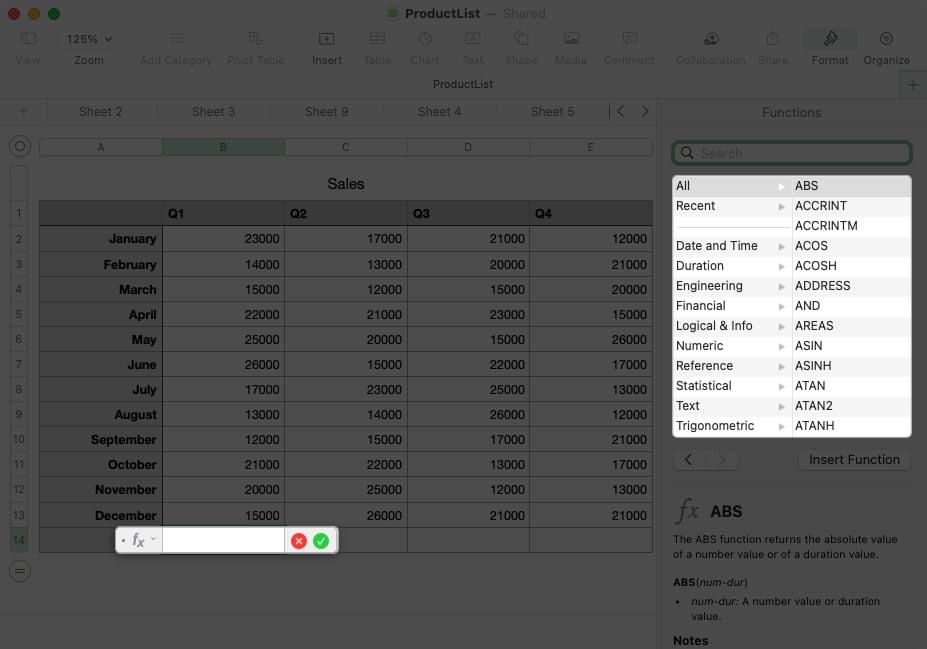
When you perform the simple calculations described above, those equations use formulas. With Numbers, you can go beyond the basics by entering advanced formulas and using a variety of functions. Because formulas and functions in Numbers could spawn a super lengthy article, we’ll just cover the essentials here. Tip: If you want a quick view of the formula, select the cell, and you’ll see the formula displayed at the bottom of the window.
Formula and function examples
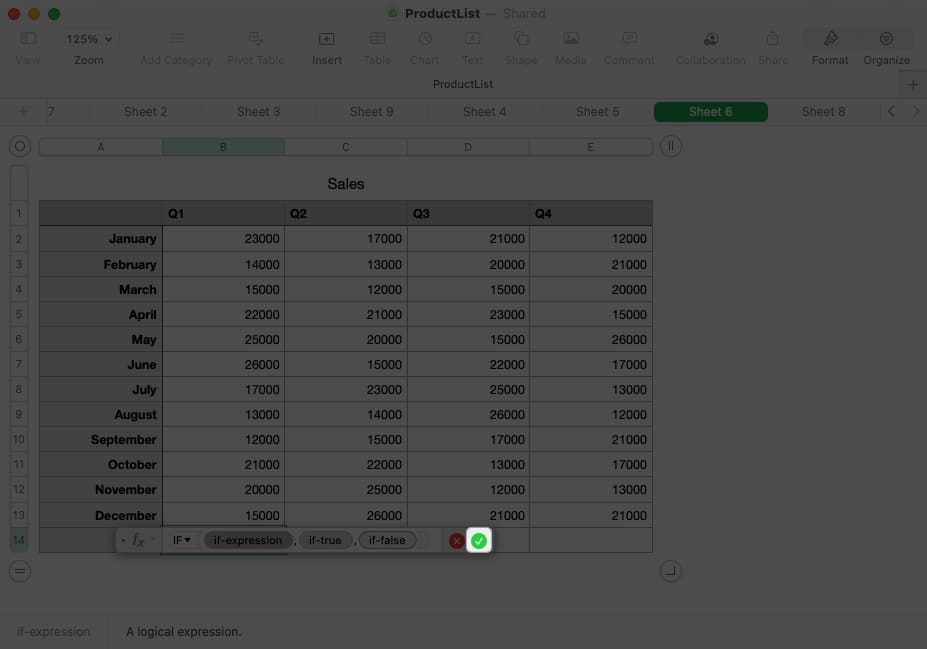
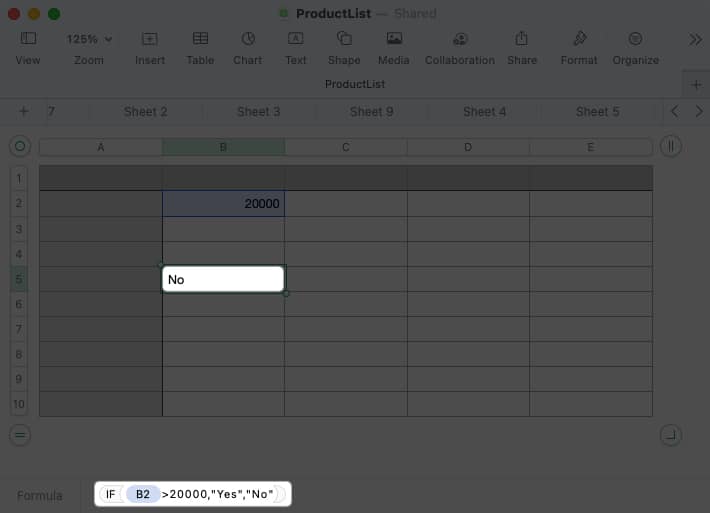
Let’s look at a couple of common formulas using functions in Numbers. Using the IF function, you can return a result for a true or false condition. For example, if the amount in cell B2 is greater than 20,000, return Yes, otherwise, return No. Here’s the formula you’d use and how it appears in the bar at the bottom: Using the CONCAT function, you can combine text from different cells. For instance, you can join the first name in cell B2 and the last name in cell C2 with the result in cell D2. You can also include a space (within quotes) between the names. Here’s the formula and how it looks in the bar at the bottom:
7. How to apply cell formatting in Numbers
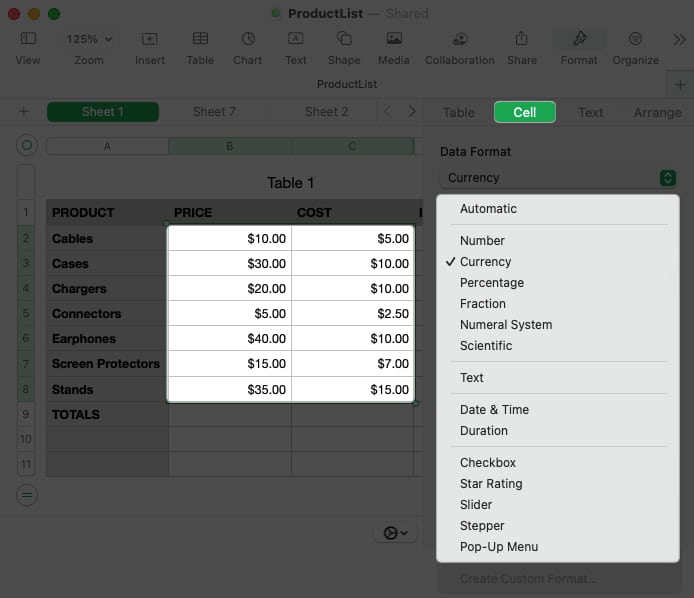
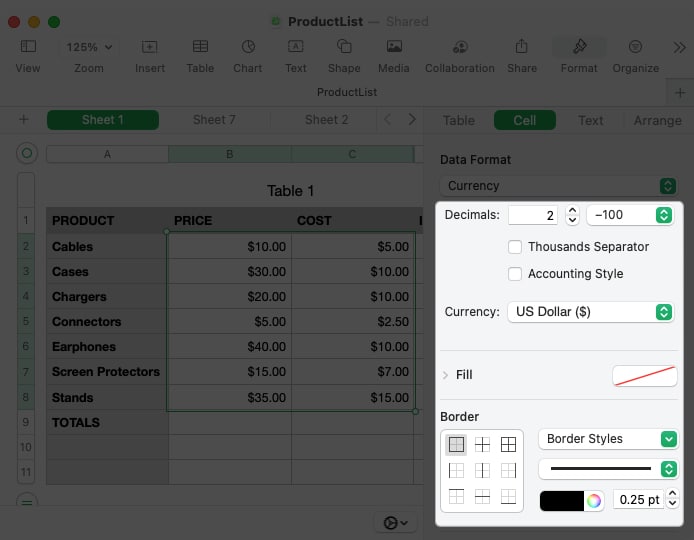
Depending on the type of data you enter in Numbers, you may want or need to format it as such. For instance, you might want numbers formatted as currency, a percentage, or a date. While Numbers offers an Automatic formatting option, you can choose and customize particular data types.
8. How to use interactive formatting in Numbers
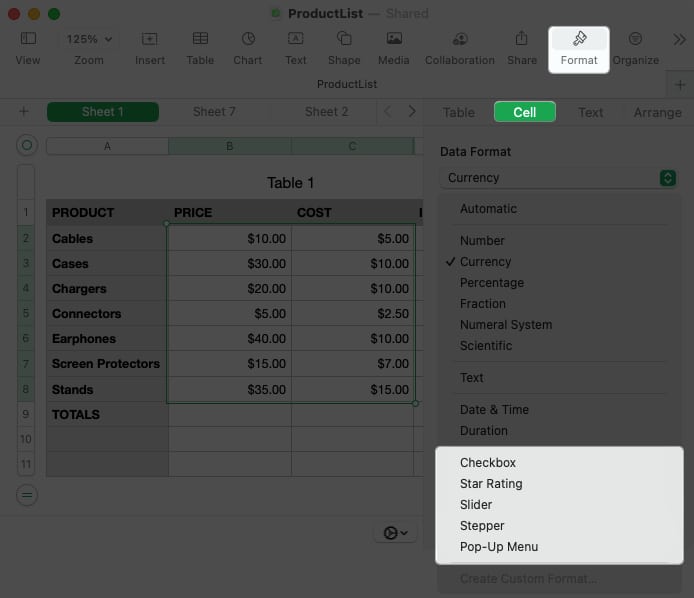
Along with formatting the data, you can format a cell with an interactive item like a checkbox or slider. This gives you a quick and easy way to mark off tasks, choose values, or add a rating.
9. How to use autofill in Numbers
Autofill is a fantastic feature that can be a true time saver. With it, you can drag from one or more cells to fill additional cells with the same value, a pattern, or a formula. The best way to explain how to use autofill is with a few examples.
Autofill the same value
Here, we want to copy the same value down to the last three cells in the column. When you select the cell, hover your cursor over it and you’ll see a yellow dot display. Drag that dot downward and release to fill the cells with the same value.
Autofill a pattern
Next, we want to list the months of the year. Rather than typing them all manually, you can select the cell containing “January” and drag the yellow dot down to fill in the remaining months.
Autofill a formula
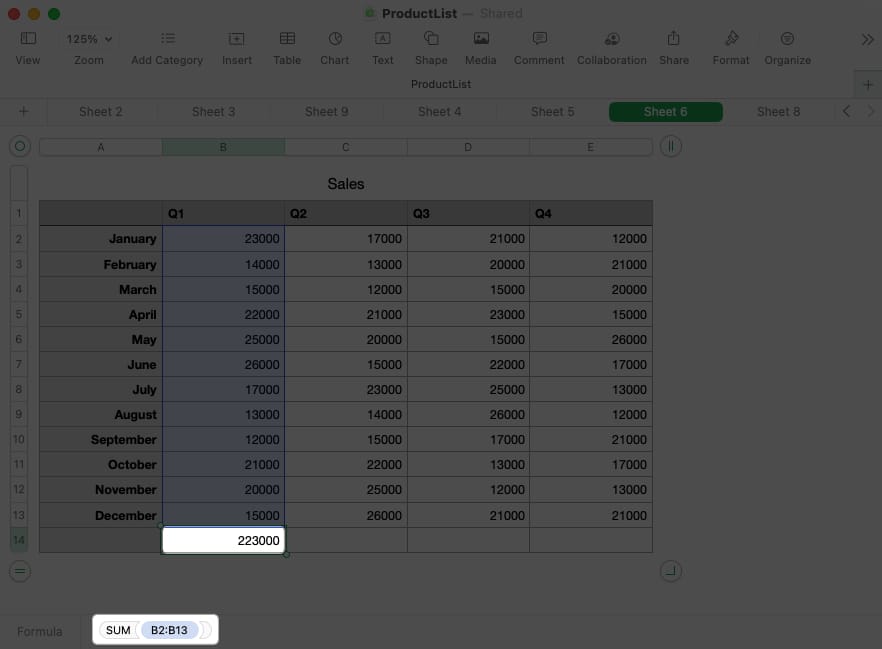
When you enter a formula or calculation into a cell that you want to use in another, you can copy and paste the formula with autofill. Numbers automatically updates the cell references so that they apply to the correct cells. Here, we have our total for Q1. We drag the cell with that SUM formula to the cells across the row to obtain the totals for the remaining quarters.
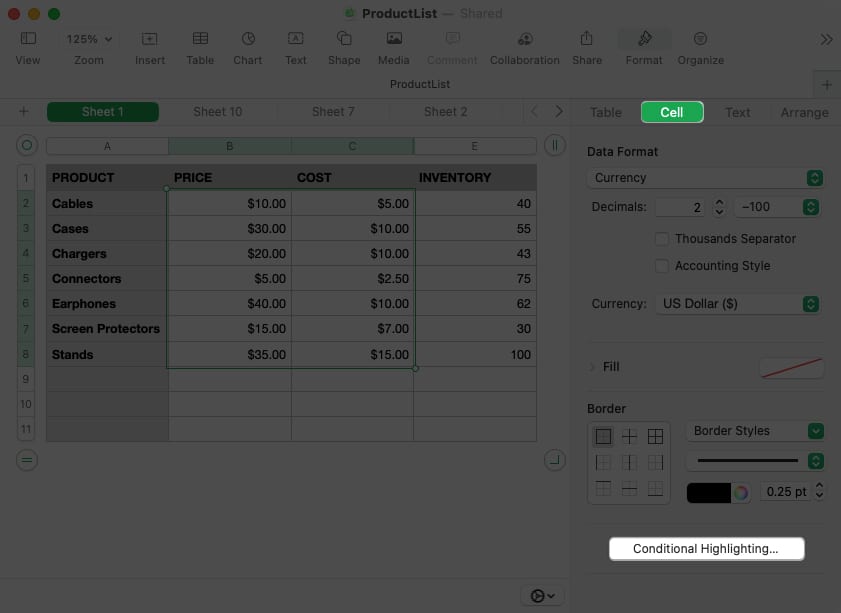
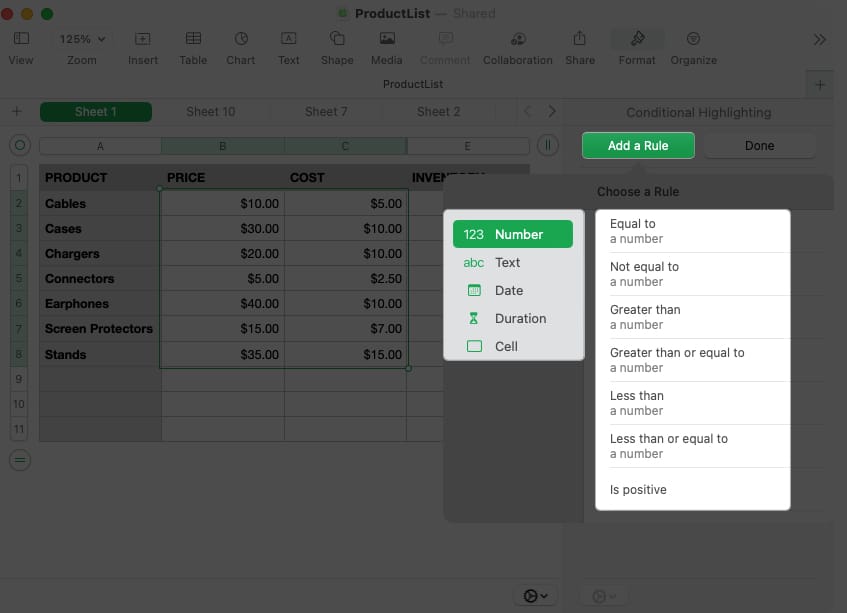
10. How to apply conditional highlighting in Numbers
With conditional highlighting, you can format your data automatically when it meets certain conditions that you set up. As examples, you can make numbers less than another number a certain font color or dates after a specific date have a cell fill color. Let’s look at an example: Here, we’ll format numbers that equal 10 in red font. Start by choosing Number and Equal To. Then, add the value “10” and choose Red Text in the format drop-down list. Now, whenever a value in our dataset is 10, we’ll see the red font pop, making it easy to spot. Do more with Numbers on Mac If you’re a Mac user and want to do more with Apple Numbers, these tips should help you get started. And if you have tips of your own you’d like to share or would like to see us cover something specific for Apple Numbers, let us know! Read more:
10 Tips to use Apple Pages on Mac like a pro! How to use TextEdit on Mac to create and edit HTML files How to sign in to your Google account using a Passkey on iPhone, iPad, and Mac
![]()


title: “10 Tips To Use Apple Numbers On Mac Effectively” ShowToc: true date: “2023-06-06” author: “John Wingfield”
We’ll walk you through several tips for using Apple Numbers on Mac. From starting with a template to applying conditional highlighting, open Numbers and follow along!
1. How to start with a template in Numbers
If you want a jumpstart on your Numbers spreadsheet, you can start with a template. You’ll find a decent selection of personal, business, and educational templates for common tasks. Once the template opens, simply add your own data. You can also make edits to the template formatting to tailor it to your needs.
2. How to sort data in Numbers
When you have a spreadsheet that includes a lot of data, manually manipulating it can be time-consuming and you run the risk of errors. Instead, you can use the sort feature for the data in your sheet.
3. How to add a link in Numbers
Maybe you’d like to include a reference to another sheet or a quick way to visit a website. You can add a link in Numbers to a sheet, email address, web page, or phone number. Then, with a simple click of the link, you can open the sheet, compose an email, visit the page, or make a phone call. To make changes to the link or remove it later, select Format in the menu bar and pick Edit Link or Remove Link.
4. How to create a chart in Numbers
Charts and graphs are terrific visuals for displaying data. They allow you to see highs and lows, trends, or patterns at a glance. In Numbers, you can choose from 2D, 3D, and interactive charts.
5. How to perform simple calculations in Numbers
One of the most common things you’ll likely do in your Numbers sheet is to perform calculations. Luckily, you can add, average, or get the maximum amount from a data set in just a couple of clicks. You’ll see Numbers use the values in the column if you use the bottom cell or row if you use the far-right cell to perform the calculation for you. To edit the formula for the calculation, double-click the cell to display the formula bar. Then, make your changes and use the checkmark in green to save it.
View calculations at a glance
Maybe you want to use one of these calculations, but not necessarily add it to your sheet. Instead, you can display one or all of them at the bottom of the window.
6. How to insert formulas in Numbers
When you perform the simple calculations described above, those equations use formulas. With Numbers, you can go beyond the basics by entering advanced formulas and using a variety of functions. Because formulas and functions in Numbers could spawn a super lengthy article, we’ll just cover the essentials here. Tip: If you want a quick view of the formula, select the cell, and you’ll see the formula displayed at the bottom of the window.
Formula and function examples
Let’s look at a couple of common formulas using functions in Numbers. Using the IF function, you can return a result for a true or false condition. For example, if the amount in cell B2 is greater than 20,000, return Yes, otherwise, return No. Here’s the formula you’d use and how it appears in the bar at the bottom: Using the CONCAT function, you can combine text from different cells. For instance, you can join the first name in cell B2 and the last name in cell C2 with the result in cell D2. You can also include a space (within quotes) between the names. Here’s the formula and how it looks in the bar at the bottom:
7. How to apply cell formatting in Numbers
Depending on the type of data you enter in Numbers, you may want or need to format it as such. For instance, you might want numbers formatted as currency, a percentage, or a date. While Numbers offers an Automatic formatting option, you can choose and customize particular data types.
8. How to use interactive formatting in Numbers
Along with formatting the data, you can format a cell with an interactive item like a checkbox or slider. This gives you a quick and easy way to mark off tasks, choose values, or add a rating.
9. How to use autofill in Numbers
Autofill is a fantastic feature that can be a true time saver. With it, you can drag from one or more cells to fill additional cells with the same value, a pattern, or a formula. The best way to explain how to use autofill is with a few examples.
Autofill the same value
Here, we want to copy the same value down to the last three cells in the column. When you select the cell, hover your cursor over it and you’ll see a yellow dot display. Drag that dot downward and release to fill the cells with the same value.
Autofill a pattern
Next, we want to list the months of the year. Rather than typing them all manually, you can select the cell containing “January” and drag the yellow dot down to fill in the remaining months.
Autofill a formula
When you enter a formula or calculation into a cell that you want to use in another, you can copy and paste the formula with autofill. Numbers automatically updates the cell references so that they apply to the correct cells. Here, we have our total for Q1. We drag the cell with that SUM formula to the cells across the row to obtain the totals for the remaining quarters.
10. How to apply conditional highlighting in Numbers
With conditional highlighting, you can format your data automatically when it meets certain conditions that you set up. As examples, you can make numbers less than another number a certain font color or dates after a specific date have a cell fill color. Let’s look at an example: Here, we’ll format numbers that equal 10 in red font. Start by choosing Number and Equal To. Then, add the value “10” and choose Red Text in the format drop-down list. Now, whenever a value in our dataset is 10, we’ll see the red font pop, making it easy to spot. Do more with Numbers on Mac If you’re a Mac user and want to do more with Apple Numbers, these tips should help you get started. And if you have tips of your own you’d like to share or would like to see us cover something specific for Apple Numbers, let us know! Read more:
10 Tips to use Apple Pages on Mac like a pro! How to use TextEdit on Mac to create and edit HTML files How to sign in to your Google account using a Passkey on iPhone, iPad, and Mac
![]()
