1. Create a new note
2. Edit a note
3. Delete notes on iPhone
No longer need a note? You can delete a note in several ways. Alternatively, from the Notes folder, you may also swipe right to left on a note and tap the red trash can icon (left image below). Or, you may long-press a note and choose Delete. Tip: To delete multiple notes from the notes folder, tap the More icon. Next, tap Select Notes, choose the entries you wish to get rid of, and finally, tap Delete.
4. Recover deleted notes
We are only human, and sometimes you may accidentally delete a note. Well, worry not! You have 30 days (40 in rare cases) to retrieve it. Learn how to restore notes on iPhone.
5. iPhone Quick Notes
Quick Notes is now not limited to iPadOS 15 and macOS 12. With this exciting iOS 16 feature, you rapidly jot down ideas, save links, and create drawings and handwritten notes. You may save it in a new or existing quick note without leaving the current app or screen. Refer to our article to learn how to use Quick Notes on your iPhone.
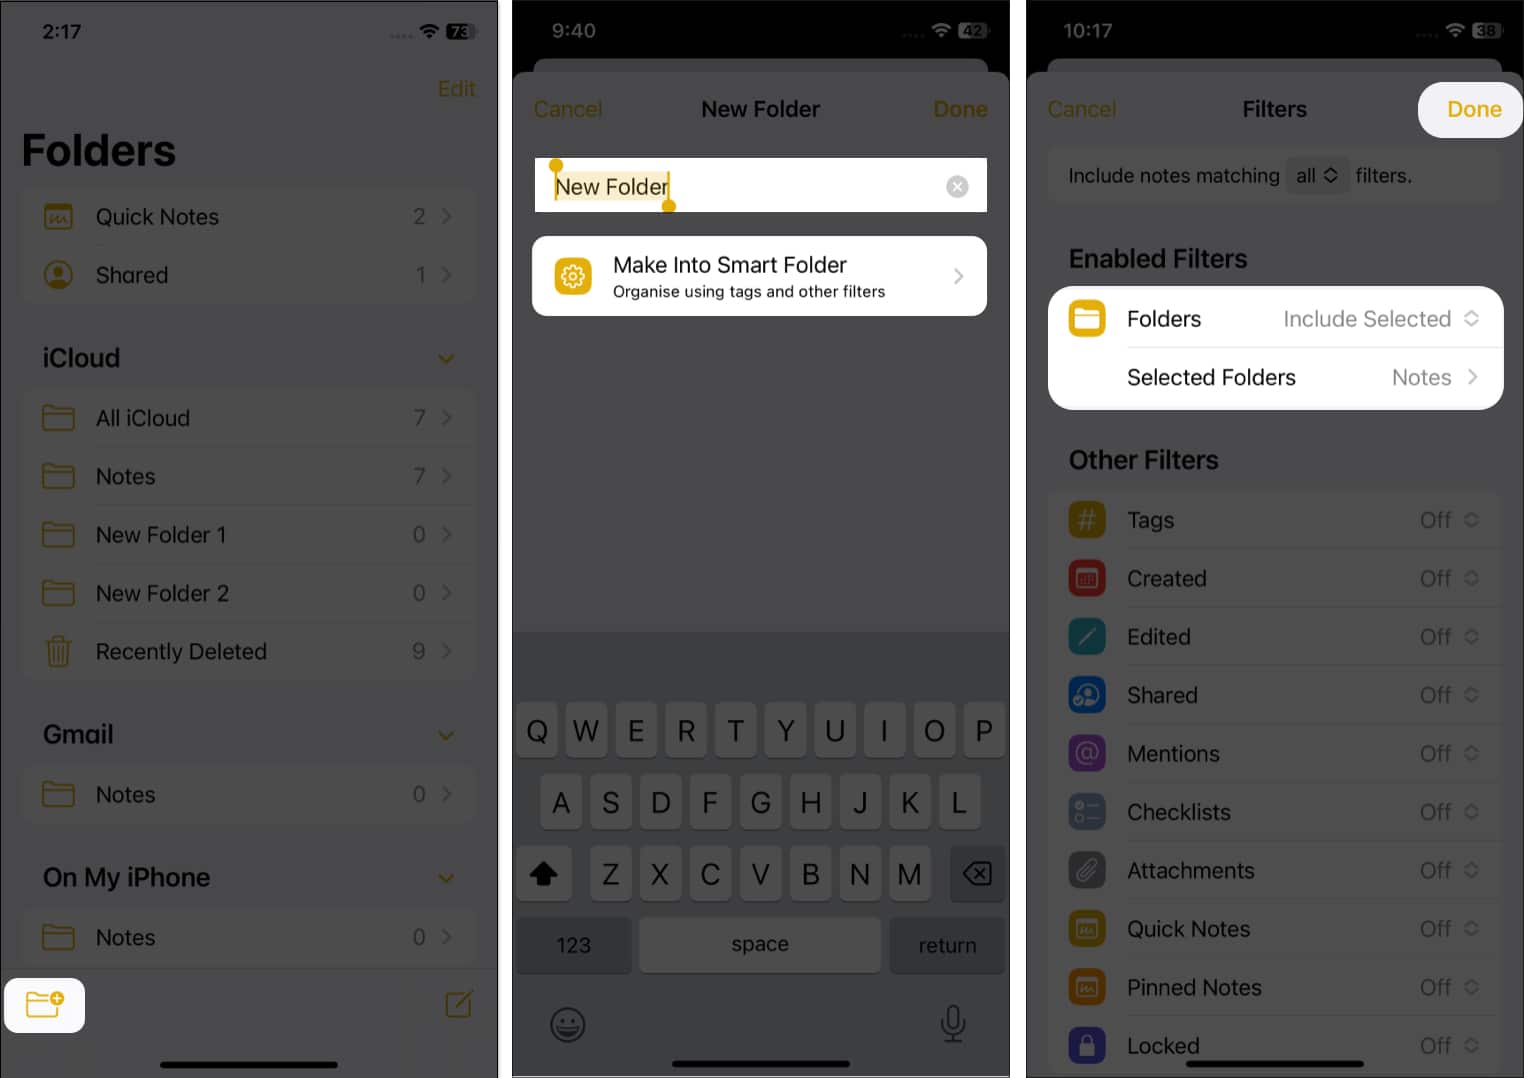
6. Create a Smart folder using filters
In iOS 16, tapping the new folder icon brings up a window where you can give the folder a name. Then tap Make Into Smart Folder to set a filter for the folder. It offers to organize notes in folders based on several filters. So, the notes matching your filters will be included in that folder. To save your choices, tap Done. Before this update, you could only organize smart folders by tags. However, you can now filter notes based on their creation and modification dates, shared status, checklists, attachments, pinned notes, etc. When you choose a filter, it will come above Other Filters under the Enabled Filters list.
Tags: Select any tag or choose any specific tag to organize your notes. Created on: You may choose a date to find notes. It also offers to set a customized date range. Edited: Same as Created, you can organize notes based on their modification date. Shared: Find notes which are shared with everyone or a specified person. Mentions: Select notes that mention you, anybody else, or certain persons. Checklist: Separate your completed or unticked checklist from your list. Attachments: If you have saved any document, like images, videos, scans, drawings, maps, websites, audio, etc., as notes, select this filter. Folders: Organize notes from multiple folders. Quick Notes, Pinned Notes, and Locked: Create a folder including or excluding these notes.
7. Password-protect your notes
iOS 16 has upgraded the locking feature to use iPhone Notes effectively. Now you may use your iPhone’s passcode to access all your private notes without setting and remembering a unique password. If you don’t want to input the password each time, you can unlock notes using Face ID or Touch ID. Additionally, access your encrypted notes across all devices by entering your current passcode. Learn how to lock Notes on iPhone.
8. Group Notes by Date
If you ask how I rearrange the list of notes, the answer will be the Group by Date feature. By default, when you use a date sorting filter, notes are automatically divided into chronological groups. So, you can see notes from Today, Yesterday, the Previous 30 days, 2021, etc. Also, turning it off will return to the previous appearance. Alternatively, you may modify it from your iPhone Settings. Go to Settings → Notes → switch off Group Notes By Date under the Viewing section.
9. Modified sharing options
iOS 16 has made sharing notes easier. Just tap the share icon from the top after opening a note. You can also see the Share Note option if you long-press a note in a folder. Previously, there was a Send a Copy option, and it has been removed because now it is a component of the new sharing menu. The share menu has changed to a standard share sheet in iOS 16. However, there are options to choose Collaborate or Send Copy. You may also change the settings from Only invited people can edit to Anyone with the link. Besides, you can set permissions for a view-only copy of your note. Another great iOS 16 feature to use iPhone Notes effectively is anyone with the invitation link can access your note. So, you don’t need to invite everyone personally. This makes it simpler to share with larger teams.
10. Shared Notes folder
Every note you have shared or are working on collaboratively will appear in the brand-new Shared smart folder in the main folder list. Thus, you may quickly discover shared notes without making a smart folder.
11. Connect with your team from shared notes
When you open a shared note, you may see a collaborator icon beside the Share button. Tapping on it offers functions like starting chatting in the Message app or making FaceTime audio or video calls with your team. Also, it will show all activity on the note and editing highlights. You may also control the sharing settings by tapping Manage Shared Note.
12. Organize notes using tags
Tags offer a quick and effortless way to categorize and organize notes in folders on iPhone. Using tags in the updated Notes app is straightforward. When creating a note, add the hashtag symbol and type the word. For example, #mango. It turns yellow, signifying the tag has been created. Afterward, go to the folders section and scroll down to the bottom to see all tags (Apple likes to call this Tag Browser). Then tap one to see all the notes that have this tag. Also, you may tap a combination of two or more tags to see notes with all the chosen tags.
13. Pin important notes on the iPhone
I have over a thousand notes. Sure, I can search to find the ones I need. But pinning the most frequent ones to the top is more efficient. To pin a note, open the Notes app → swipe left to right on a note → tap the pin icon. Follow the same steps to unpin.
14. Use Siri to create a note
Siri, the inbuilt Apple voice assistant, lets you effortlessly create notes using your voice. For this, summon Siri by pressing the Side button/Home button or saying, ‘Hey Siri.’ Next, ask it something like, “Make a note that my train for Delhi will arrive on platform number 6, and my coach will be placed near the escalator.”
15. Create a note from other apps
Thanks to the addition of the Notes app in the iOS/iPadOS Share Sheet, you can easily create a note straight from other apps, like Photos. Besides you can also create a Quick Note by selecting Add to New Quick Notes. Pro Tip: From Safari, you can save the full article link with the article name (above steps). But you may also select text and tap Share. Next, choose Notes to create a note with only the selected text. It is handy to save parts of an article (say quotes or figures) to the Notes app instead of the full article link.
16. Create a checklist
Have a grocery shopping list or a to-do list for the weekend? The Notes app makes it effortless to create checklists. So, how do you make a checkbox in notes? Let’s find out! Easiest way: From the Home Screen, long-press the Notes app icon and choose New Checklist. Now, type the first entry. Tap return on the keyboard to add more. Alternatively, open the Notes app and tap the compose icon. From the top of the keyboard, tap on the checklist icon (circle with a tick) and start typing. When you have finished, tap Done.
17. Format text in the Notes app
We agree that long text without bold, italics, bullet points, etc., is monotonous to read. So here’s how to spice things up and make them easy to read. You can also insert tables inside the Notes app. Tip: If you want all your new notes to start with a Title and then Body, open the Settings app → Notes → New Notes Start With → choose the desired option.
18. Use different fonts in the Notes app
You are not limited to the default font while creating notes. Like Pages, Numbers, Twitter, Instagram, and a handful of other apps, the Notes app can change font style also support third-party fonts. You can learn how to install and use them on your iPhone.
19. Change the paper style in the Notes app
By default, the Notes app has a plain white background. If you wish, you have the option to use lines and grids. This is particularly helpful when using an iPad’s Apple Pencil to handwrite something.
20. Add media (photos and videos) to the Notes app
Note: To add maps, open Apple Maps, search for a place, swipe up a bit to reveal the Share button, and tap it. Finally, choose Notes and tap Save. You can do the same via Google Maps by tapping the share icon from the top right.
21. Scan documents using the Notes app
You can scan any document using the Notes app without installing any third-party scanning app. Learn how to do it. Alternatively, you can long-press the Notes app icon on the Home Screen and choose Scan Documents. Next, point the camera to a document and capture it. Adjust the corners, and once you are satisfied, tap Keep Scan → Save.
22. See all attachments in one place
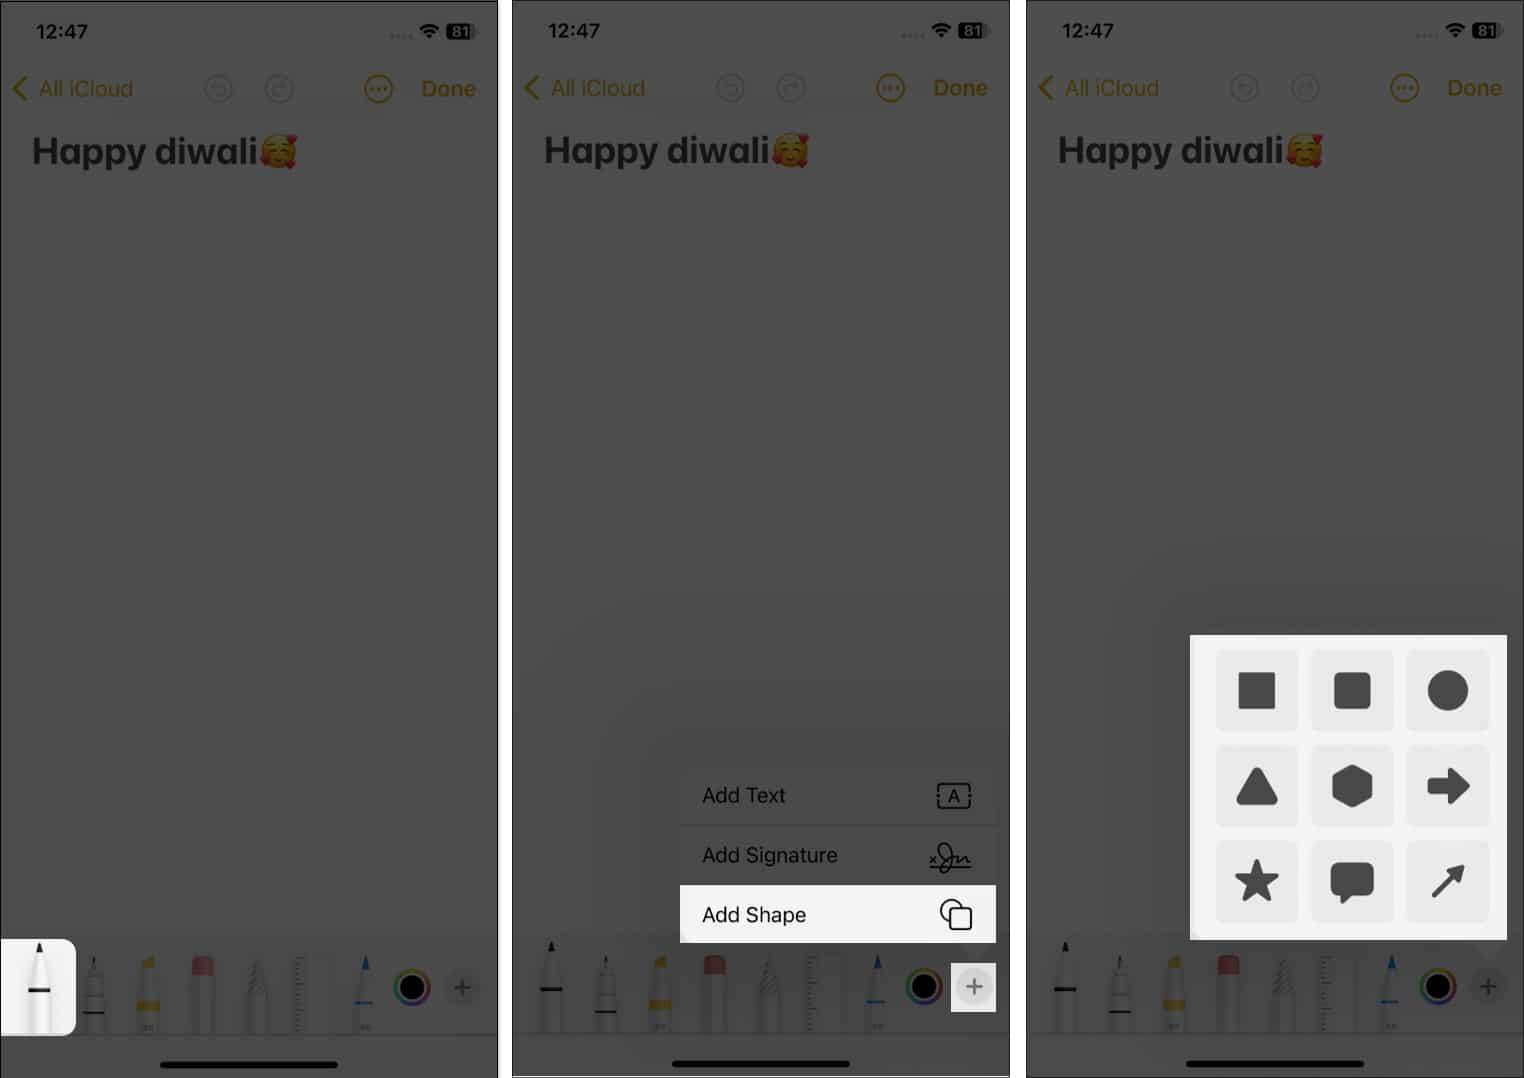
23. Draw and sketch inside Notes
24. Add notes shortcut to Control Center
You may customize your Control Center on your iPhone to add the Notes app and Quick Notes feature. So, you can begin a new note instantly without opening the app.
25. Add notes to lockscreen
Have to jot something quickly without unlocking the iPhone? You can add the compose note icon to Control Center and then choose to create a new note or resume adding to the last viewed one for a particular time. You can learn how to do this here.
26. Add the Notes app widget to the iPhone Home Screen
With iOS 16, you can now have the Notes app widgets on your iPhone Home Screen. This makes it instant to get inside one of your notes folders or any specific note or access your more recent Quick Note.
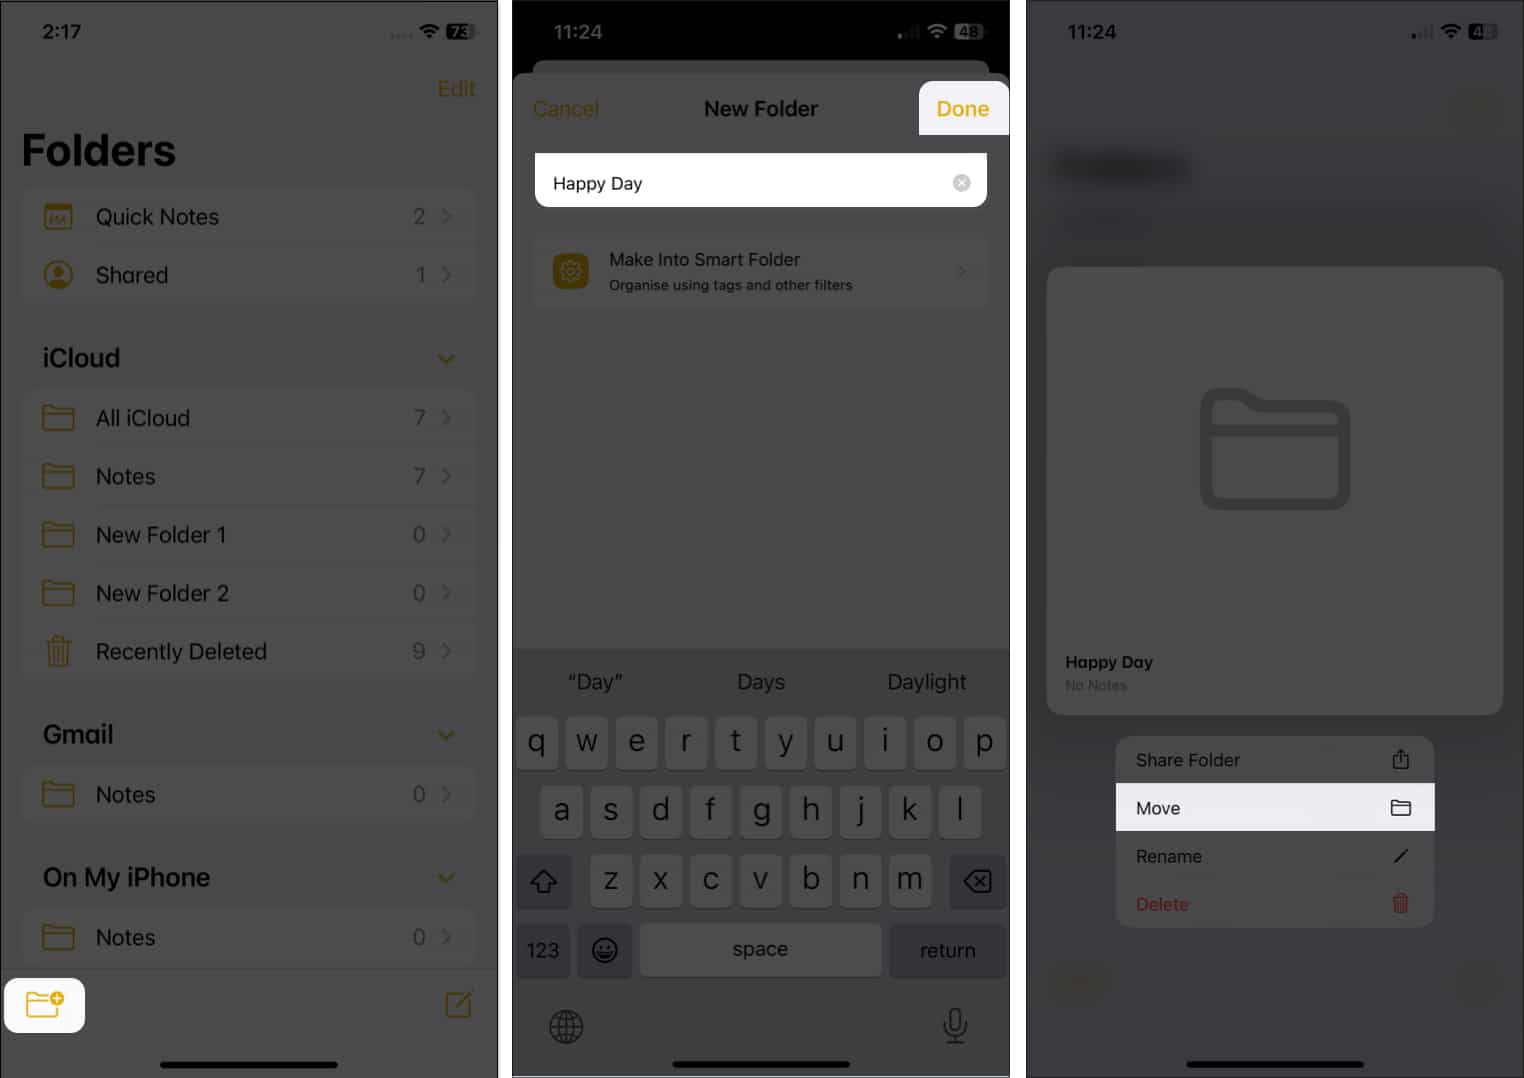
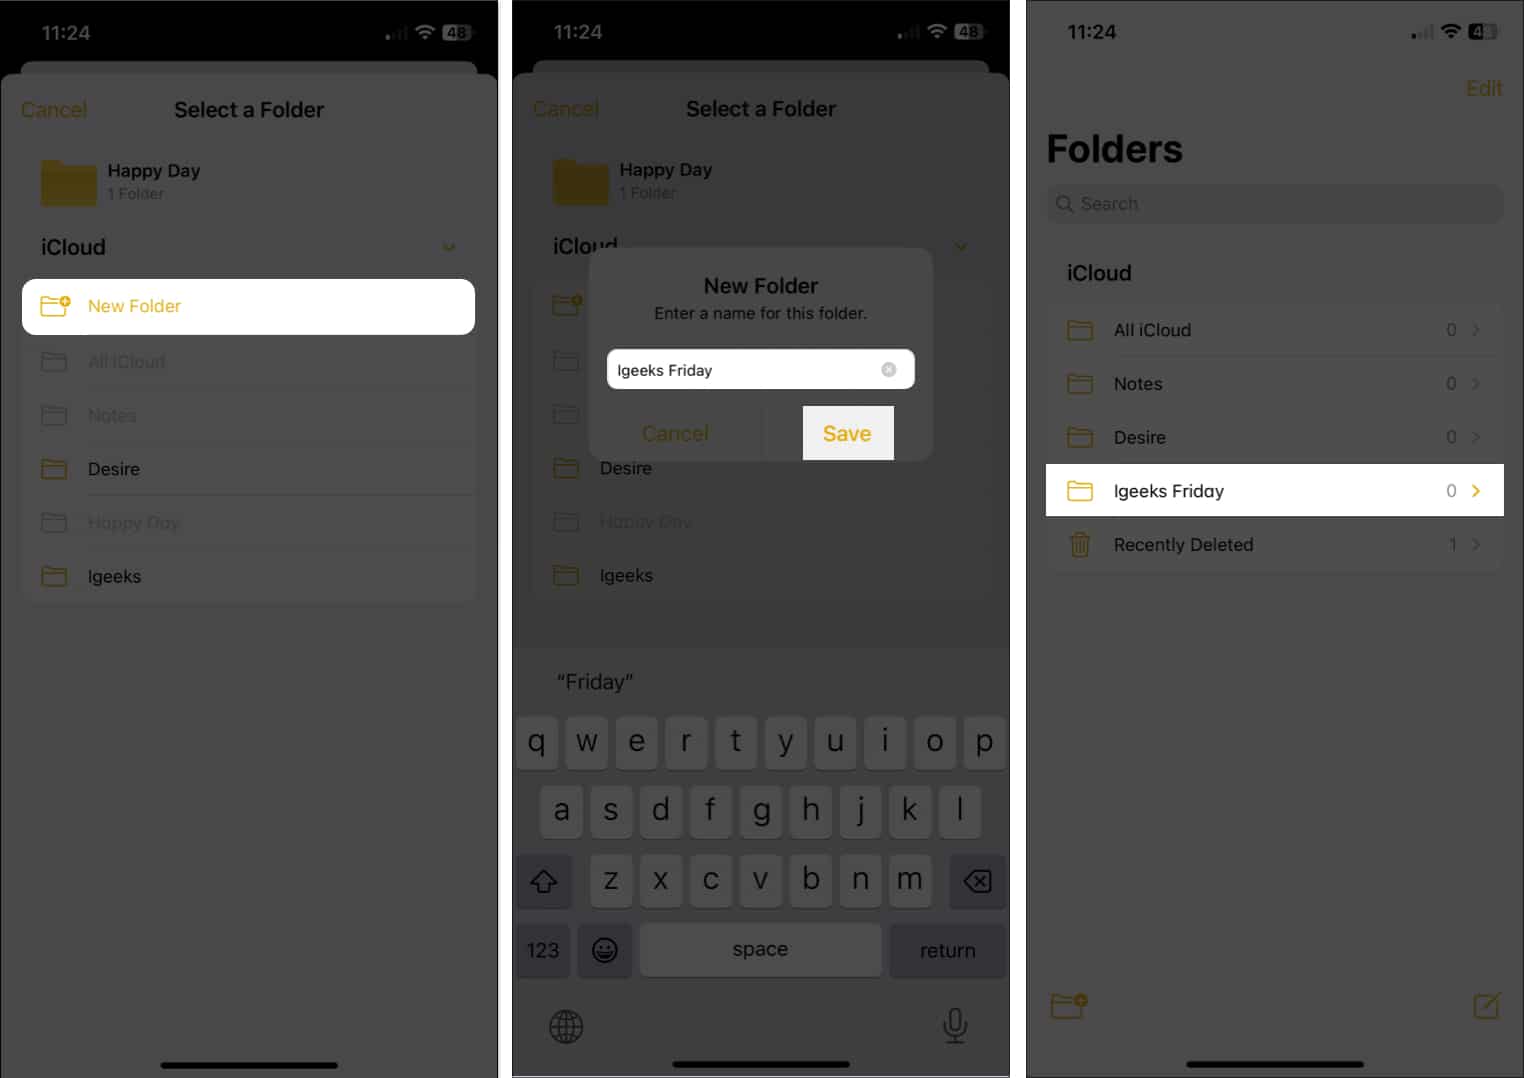
27. Create sub-folders
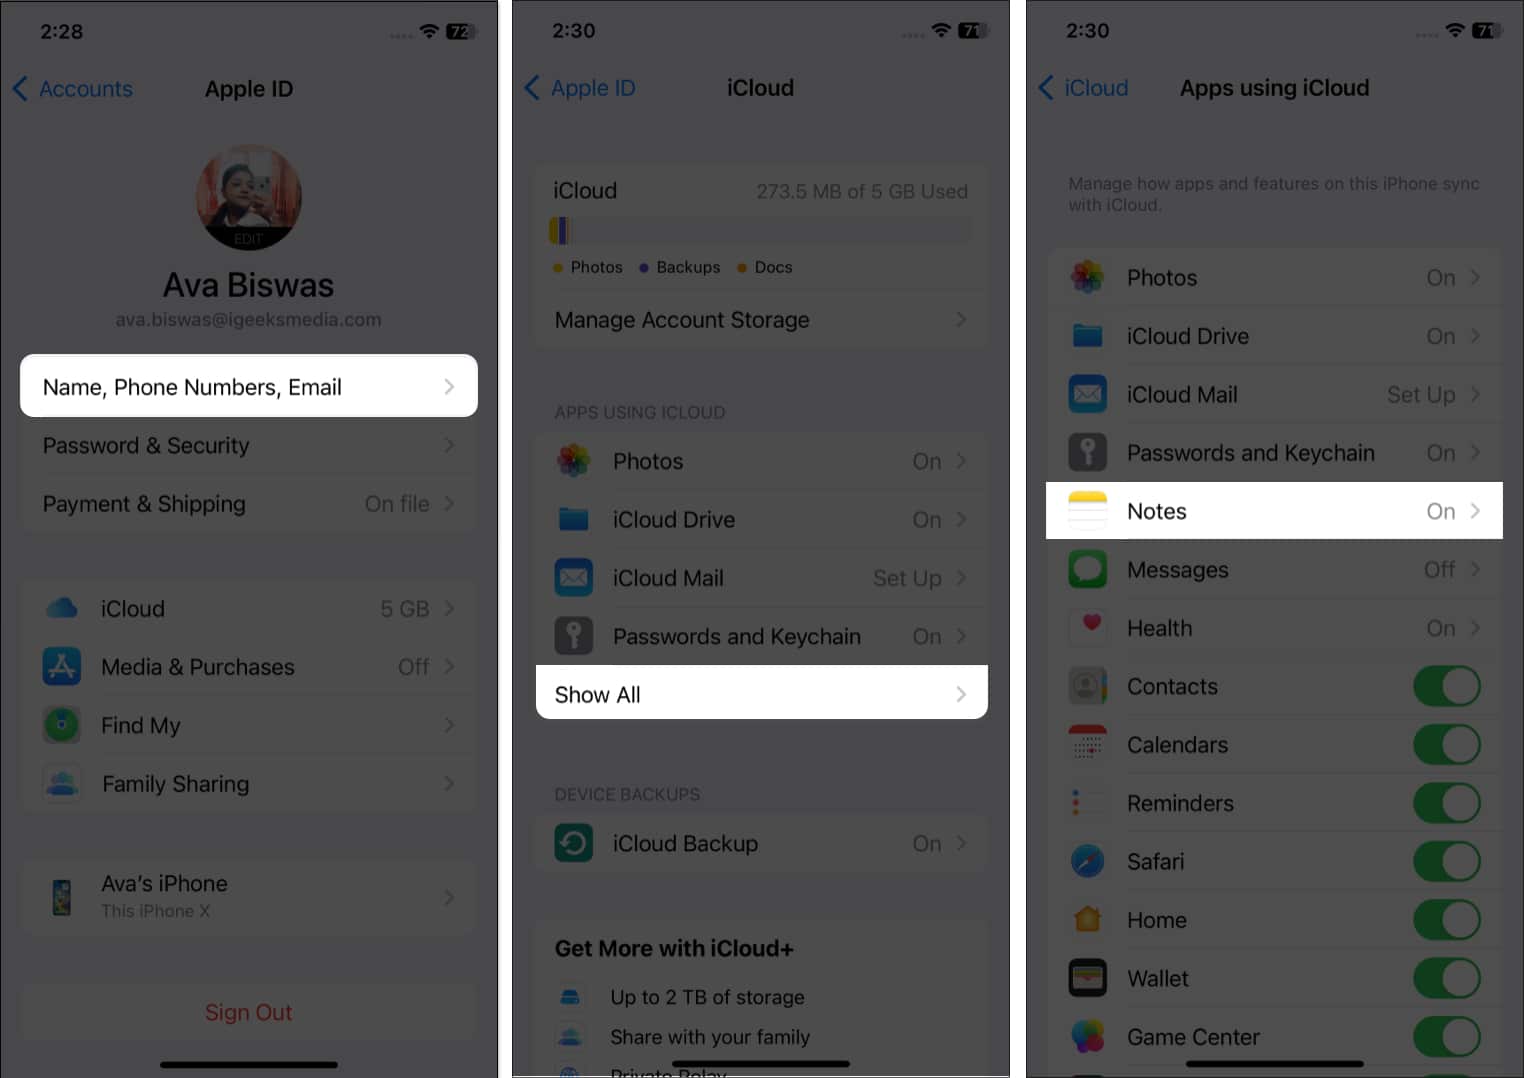
28. Sync notes to iCloud, Google, etc.
You can sync your notes to iCloud (default), Google, or other services, have them offline on the device, or even have multiple accounts! For this: Note: I only use iCloud. But few of my colleagues use both Gmail and iCloud. According to your convenience, you can use whatever you like. You can also change the default notes location (like iCloud, Gmail, locally on the device, etc.).
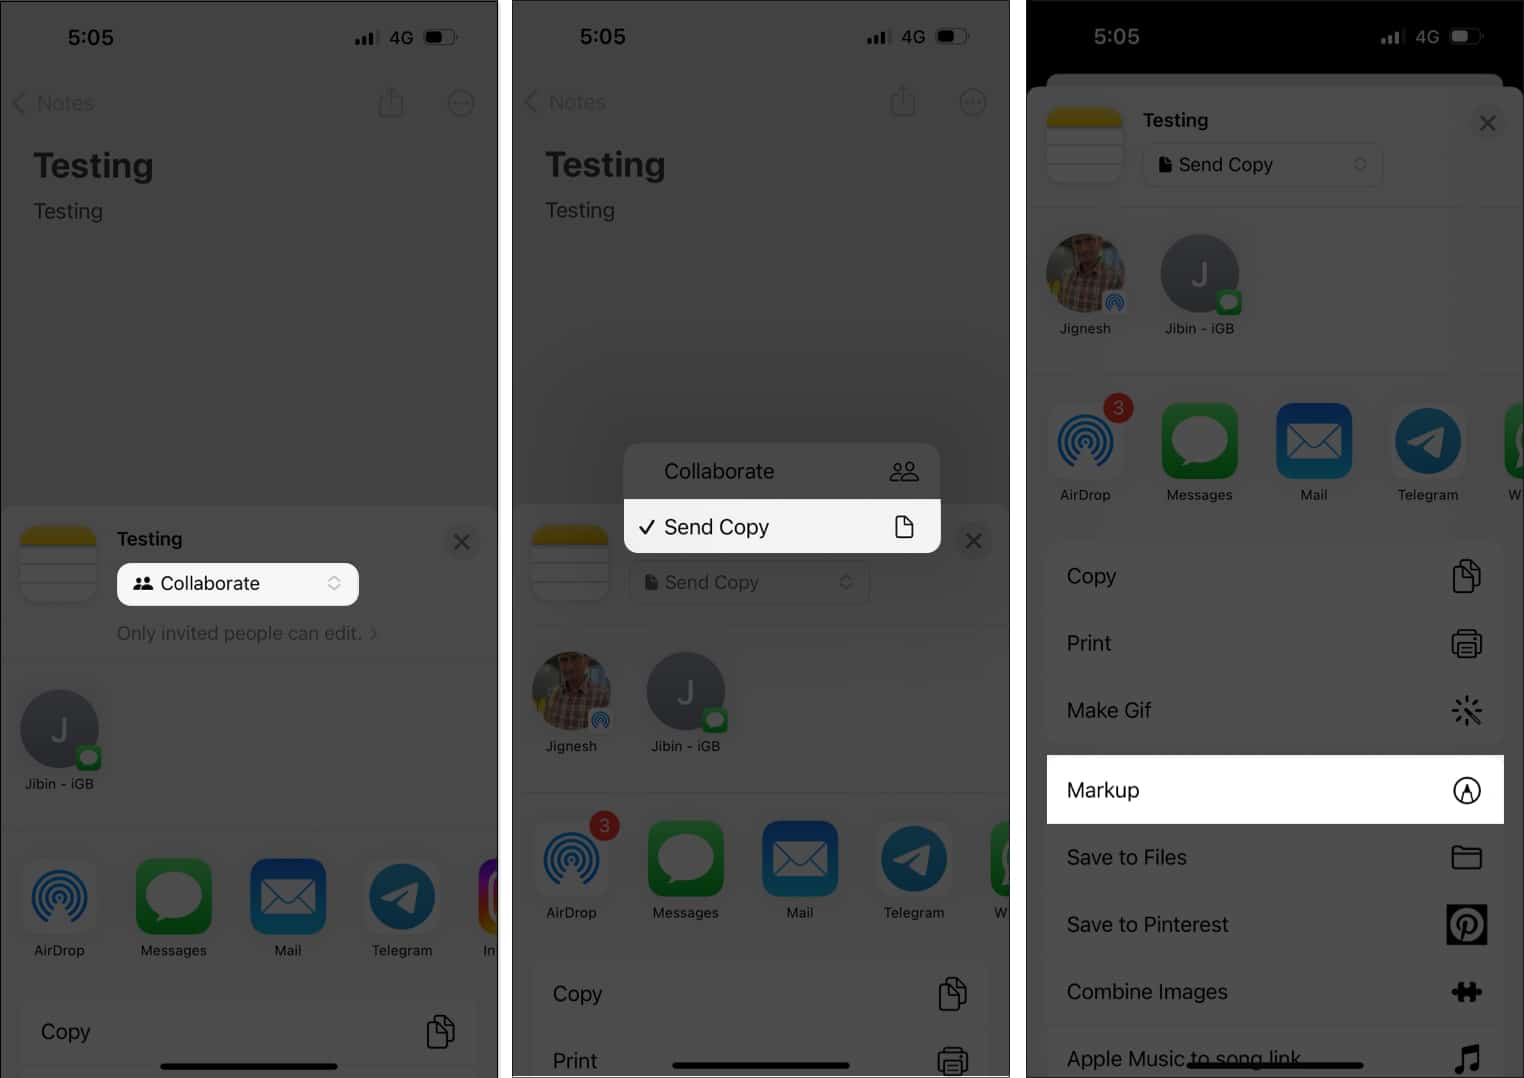
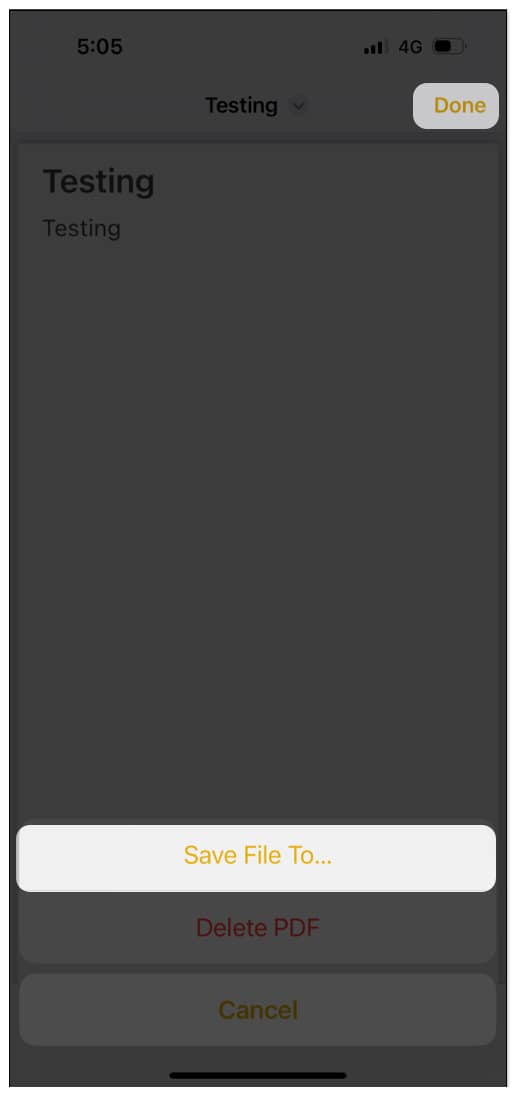
29. Save a note as a PDF
Ready to use notes on iPhone like a pro! I believe the Apple Notes tips here helped you master note-taking on the iPhone and iPad. If you have any additional tips you would like to share (and include them in this list), please share them in the comments section below! Read more…
How to share Notes app folders on iPhone, iPad, and Mac How to find and replace text in Notes app on iPhone Best free note-taking apps for iPhone and iPad How to change default account for Notes app on iPhone, iPad, and Mac


![]()


title: “29 Tips To Use Notes App On Iphone Like A Pro " ShowToc: true date: “2023-05-12” author: “Sara Honig”
1. Create a new note
2. Edit a note
3. Delete notes on iPhone
No longer need a note? You can delete a note in several ways. Alternatively, from the Notes folder, you may also swipe right to left on a note and tap the red trash can icon (left image below). Or, you may long-press a note and choose Delete. Tip: To delete multiple notes from the notes folder, tap the More icon. Next, tap Select Notes, choose the entries you wish to get rid of, and finally, tap Delete.
4. Recover deleted notes
We are only human, and sometimes you may accidentally delete a note. Well, worry not! You have 30 days (40 in rare cases) to retrieve it. Learn how to restore notes on iPhone.
5. iPhone Quick Notes
Quick Notes is now not limited to iPadOS 15 and macOS 12. With this exciting iOS 16 feature, you rapidly jot down ideas, save links, and create drawings and handwritten notes. You may save it in a new or existing quick note without leaving the current app or screen. Refer to our article to learn how to use Quick Notes on your iPhone.
6. Create a Smart folder using filters
In iOS 16, tapping the new folder icon brings up a window where you can give the folder a name. Then tap Make Into Smart Folder to set a filter for the folder. It offers to organize notes in folders based on several filters. So, the notes matching your filters will be included in that folder. To save your choices, tap Done. Before this update, you could only organize smart folders by tags. However, you can now filter notes based on their creation and modification dates, shared status, checklists, attachments, pinned notes, etc. When you choose a filter, it will come above Other Filters under the Enabled Filters list.
Tags: Select any tag or choose any specific tag to organize your notes. Created on: You may choose a date to find notes. It also offers to set a customized date range. Edited: Same as Created, you can organize notes based on their modification date. Shared: Find notes which are shared with everyone or a specified person. Mentions: Select notes that mention you, anybody else, or certain persons. Checklist: Separate your completed or unticked checklist from your list. Attachments: If you have saved any document, like images, videos, scans, drawings, maps, websites, audio, etc., as notes, select this filter. Folders: Organize notes from multiple folders. Quick Notes, Pinned Notes, and Locked: Create a folder including or excluding these notes.
7. Password-protect your notes
iOS 16 has upgraded the locking feature to use iPhone Notes effectively. Now you may use your iPhone’s passcode to access all your private notes without setting and remembering a unique password. If you don’t want to input the password each time, you can unlock notes using Face ID or Touch ID. Additionally, access your encrypted notes across all devices by entering your current passcode. Learn how to lock Notes on iPhone.
8. Group Notes by Date
If you ask how I rearrange the list of notes, the answer will be the Group by Date feature. By default, when you use a date sorting filter, notes are automatically divided into chronological groups. So, you can see notes from Today, Yesterday, the Previous 30 days, 2021, etc. Also, turning it off will return to the previous appearance. Alternatively, you may modify it from your iPhone Settings. Go to Settings → Notes → switch off Group Notes By Date under the Viewing section.
9. Modified sharing options
iOS 16 has made sharing notes easier. Just tap the share icon from the top after opening a note. You can also see the Share Note option if you long-press a note in a folder. Previously, there was a Send a Copy option, and it has been removed because now it is a component of the new sharing menu. The share menu has changed to a standard share sheet in iOS 16. However, there are options to choose Collaborate or Send Copy. You may also change the settings from Only invited people can edit to Anyone with the link. Besides, you can set permissions for a view-only copy of your note. Another great iOS 16 feature to use iPhone Notes effectively is anyone with the invitation link can access your note. So, you don’t need to invite everyone personally. This makes it simpler to share with larger teams.
10. Shared Notes folder
Every note you have shared or are working on collaboratively will appear in the brand-new Shared smart folder in the main folder list. Thus, you may quickly discover shared notes without making a smart folder.
11. Connect with your team from shared notes
When you open a shared note, you may see a collaborator icon beside the Share button. Tapping on it offers functions like starting chatting in the Message app or making FaceTime audio or video calls with your team. Also, it will show all activity on the note and editing highlights. You may also control the sharing settings by tapping Manage Shared Note.
12. Organize notes using tags
Tags offer a quick and effortless way to categorize and organize notes in folders on iPhone. Using tags in the updated Notes app is straightforward. When creating a note, add the hashtag symbol and type the word. For example, #mango. It turns yellow, signifying the tag has been created. Afterward, go to the folders section and scroll down to the bottom to see all tags (Apple likes to call this Tag Browser). Then tap one to see all the notes that have this tag. Also, you may tap a combination of two or more tags to see notes with all the chosen tags.
13. Pin important notes on the iPhone
I have over a thousand notes. Sure, I can search to find the ones I need. But pinning the most frequent ones to the top is more efficient. To pin a note, open the Notes app → swipe left to right on a note → tap the pin icon. Follow the same steps to unpin.
14. Use Siri to create a note
Siri, the inbuilt Apple voice assistant, lets you effortlessly create notes using your voice. For this, summon Siri by pressing the Side button/Home button or saying, ‘Hey Siri.’ Next, ask it something like, “Make a note that my train for Delhi will arrive on platform number 6, and my coach will be placed near the escalator.”
15. Create a note from other apps
Thanks to the addition of the Notes app in the iOS/iPadOS Share Sheet, you can easily create a note straight from other apps, like Photos. Besides you can also create a Quick Note by selecting Add to New Quick Notes. Pro Tip: From Safari, you can save the full article link with the article name (above steps). But you may also select text and tap Share. Next, choose Notes to create a note with only the selected text. It is handy to save parts of an article (say quotes or figures) to the Notes app instead of the full article link.
16. Create a checklist
Have a grocery shopping list or a to-do list for the weekend? The Notes app makes it effortless to create checklists. So, how do you make a checkbox in notes? Let’s find out! Easiest way: From the Home Screen, long-press the Notes app icon and choose New Checklist. Now, type the first entry. Tap return on the keyboard to add more. Alternatively, open the Notes app and tap the compose icon. From the top of the keyboard, tap on the checklist icon (circle with a tick) and start typing. When you have finished, tap Done.
17. Format text in the Notes app
We agree that long text without bold, italics, bullet points, etc., is monotonous to read. So here’s how to spice things up and make them easy to read. You can also insert tables inside the Notes app. Tip: If you want all your new notes to start with a Title and then Body, open the Settings app → Notes → New Notes Start With → choose the desired option.
18. Use different fonts in the Notes app
You are not limited to the default font while creating notes. Like Pages, Numbers, Twitter, Instagram, and a handful of other apps, the Notes app can change font style also support third-party fonts. You can learn how to install and use them on your iPhone.
19. Change the paper style in the Notes app
By default, the Notes app has a plain white background. If you wish, you have the option to use lines and grids. This is particularly helpful when using an iPad’s Apple Pencil to handwrite something.
20. Add media (photos and videos) to the Notes app
Note: To add maps, open Apple Maps, search for a place, swipe up a bit to reveal the Share button, and tap it. Finally, choose Notes and tap Save. You can do the same via Google Maps by tapping the share icon from the top right.
21. Scan documents using the Notes app
You can scan any document using the Notes app without installing any third-party scanning app. Learn how to do it. Alternatively, you can long-press the Notes app icon on the Home Screen and choose Scan Documents. Next, point the camera to a document and capture it. Adjust the corners, and once you are satisfied, tap Keep Scan → Save.
22. See all attachments in one place
23. Draw and sketch inside Notes
24. Add notes shortcut to Control Center
You may customize your Control Center on your iPhone to add the Notes app and Quick Notes feature. So, you can begin a new note instantly without opening the app.
25. Add notes to lockscreen
Have to jot something quickly without unlocking the iPhone? You can add the compose note icon to Control Center and then choose to create a new note or resume adding to the last viewed one for a particular time. You can learn how to do this here.
26. Add the Notes app widget to the iPhone Home Screen
With iOS 16, you can now have the Notes app widgets on your iPhone Home Screen. This makes it instant to get inside one of your notes folders or any specific note or access your more recent Quick Note.
27. Create sub-folders
28. Sync notes to iCloud, Google, etc.
You can sync your notes to iCloud (default), Google, or other services, have them offline on the device, or even have multiple accounts! For this: Note: I only use iCloud. But few of my colleagues use both Gmail and iCloud. According to your convenience, you can use whatever you like. You can also change the default notes location (like iCloud, Gmail, locally on the device, etc.).
29. Save a note as a PDF
Ready to use notes on iPhone like a pro! I believe the Apple Notes tips here helped you master note-taking on the iPhone and iPad. If you have any additional tips you would like to share (and include them in this list), please share them in the comments section below! Read more…
How to share Notes app folders on iPhone, iPad, and Mac How to find and replace text in Notes app on iPhone Best free note-taking apps for iPhone and iPad How to change default account for Notes app on iPhone, iPad, and Mac
![]()
